Tuesday, January 16, 2024

PIC16F887 KeyPad and Character LCD Example using XC8

A keypad scanning program is common for most of micro-controller programming students. It usually done by the Assembly language programming in a micro-processor class in university. However using C compiler to program the keypad scanning process is very easy, and it's almost readable for most C programmers.
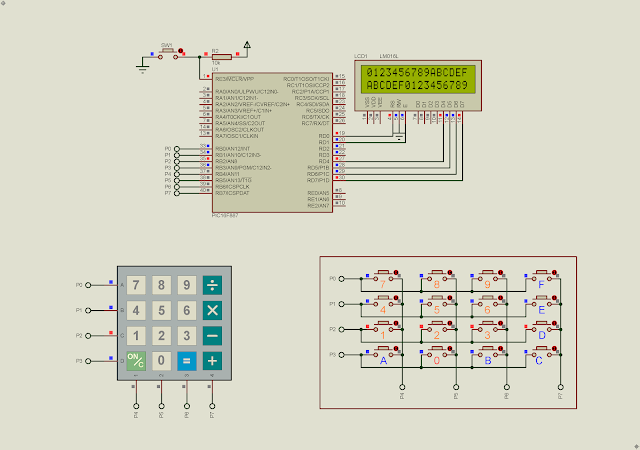
PIC16F887 KeyPad and Character LCD Example using XC8
Simulating Program

Using a single 8-bit I/O port can make a 4x4 (16 keys) matrix keypad. It's divided into two nibbles, one nibble for output and another nibble for input data.

PIC16F887 KeyPad and Character LCD Example using XC8
Arduino 4x4 Matrix Keypad Module


In this example, I use a PIC16F887 micro-controller to scan a 4x4 matrix keypad. Input key will show on a 16x2 character LCD. 

  1. /*
  2.  * File: main.c
  3.  * Author: Admin
  4.  *
  5.  * Created on January 16, 2024, 7:46 PM
  6.  */
  7.  
  8. #include <xc.h>
  9. #include "config.h"
  10. #include "LCD4Bits.h"
  11.  
  12. #define _XTAL_FREQ 8000000UL
  13.  
  14. uint8_t key_16[][4]={'7','8','9','F',
  15. '4','5','6','E',
  16. '1','2','3','D',
  17. 'A','0','B','C'};
  18.  
  19. uint8_t scanKey(void){
  20. char data=0,temp;
  21. for(uint8_t i=0;i<4;i++){
  22. PORTB=1<<i;
  23. data=PORTB&0xF0;
  24. if(data&(1<<4)) {temp=key_16[i][0]; break;}
  25. else if(data&(1<<5)){temp=key_16[i][1]; break;}
  26. else if(data&(1<<6)){temp=key_16[i][2]; break;}
  27. else if(data&(1<<7)){temp=key_16[i][3]; break;}
  28. else temp=0;
  29. __delay_ms(10);
  30. }
  31. return temp;
  32. }
  33.  
  34. void main(void) {
  35. OSCCONbits.IRCF=7;
  36. uint8_t temp,count=0,row=0;
  37. PORTB=0;
  38. TRISB=0xF0;
  39. ANSELH=0;
  40. lcdInit();
  41.  
  42. while(1){
  43. temp=scanKey();
  44. if(temp!=0){
  45. lcdData(temp);
  46. count++;
  47. __delay_ms(250);
  48. }
  49. if(count>16){count=0; lcdCommand(0xC0); row+=1;}
  50. if(row>=2) {
  51. count=0;
  52. lcdXY(1,1);
  53. lcdCommand(0x01);
  54. __delay_ms(10);
  55. row=0;
  56. }
  57. }
  58. return;
  59. }
  60.  

After a 16 key-press count, a new line will start. After two lines, the display will clear, and it will return home.

Click here to download this example from GitHub. See also,

No comments:

Post a Comment

Search This Blog

Labels

25AA010A (1) 8051 (7) 93AA46B (1) ADC (30) Analog Comparator (1) Arduino (15) ARM (6) AT89C52 (7) ATMega32 (56) AVR (57) CCS PICC (28) DAC (1) DHT11 (2) Display (105) Distance Sensor (3) DS18B20 (3) dsPIC (2) dsPIC30F1010 (2) EEPROM (5) Environment Sensor (4) esp8266 (1) I2C (29) Input/Output (67) Interrupt (19) Keil (5) Keypad (10) LCD (47) Master/Slave (1) MAX7221 (1) MCP23017 (5) MCP23S17 (4) Meter (3) MikroC (2) Motor (15) MPLABX (71) Nokia 5110 LCD (3) OLED (2) One-Wire (6) Oscillator (8) PCB (6) PCD8544 (3) PCF8574 (5) PIC (107) PIC12F (2) PIC16F628A (2) PIC16F630 (1) PIC16F716 (3) PIC16F818 (10) PIC16F818/819 (2) PIC16F84A (15) PIC16F876A (1) PIC16F877A (9) PIC16F88 (1) PIC16F887 (60) PIC18 (19) PIC18F1220 (4) PIC18F2550 (3) PIC18F4550 (12) PWM (11) RTC (8) Sensor (10) SH1106 (1) Shift Register (11) Shift Registers (3) SPI (24) STM32 (6) STM32 Blue Pill (6) STM32CubeIDE (6) STM32F103C8T6 (6) SysTick (3) temperature sensor (11) Thermometer (21) Timer/Counter (31) TM1637 (2) UART (7) Ultrasonic (4) Voltmeter (7) WDT (1) XC16 (2) XC8 (94)